Lecture 1 — Digit Classification and Linux
Getting Started with Linux
We will start learning Linux by running and comparing nearest‑neighbor classification codes for MNIST digits written in: Python, C, and CUDA.
What is MNIST?
A classic dataset of handwritten digits (0–9).
- Training set: 60,000 grayscale images
- Test set: 10,000 grayscale images
- Each image is 28×28 pixels (stored as intensity values 0–255)
We’ll use Linux shell commands in Google Colab to: clone the repo, inspect files, build/run programs, and generate figures.
What is the Command Line Interface (CLI)?
The CLI is how we interact with the computer by typing commands instead of clicking.
- In Colab, the CLI is a Linux shell (specifically bash).
- We’ll use it to navigate directories, build programs, and run code.
- Every box you see below is a Linux command you can type or copy-paste directly into a Google Colab terminal.
We’ll use Git go download the MNIST files and the digit classification codes.
What Is Git?
Git is a version control system.
In this class we’ll use it in two ways:
- Shared course repo (
cmda3634_materials): I’ll use it to distribute starter code, examples, and datasets.
- Your private repo (
cmda3634): You’ll set this up later to do your own work and submit assignments.
Think of Git as the tool that keeps code organized and synchronized between your computer and the cloud.
Step 1 : Clone the CMDA 3634 Course Materials
We access the CLI on Google Colab:
- Open Google Colab in your browser and log in with your Google account.
- Start a new Python notebook (File → New Notebook).
- At the bottom of the Colab window, click the Terminal button to open a Linux shell.
- You now have two panels: the notebook (for Python) and the terminal (for Linux).
- Resize or arrange the windows so you can see both.
- You now have two panels: the notebook (for Python) and the terminal (for Linux).
In the terminal, type the following command to clone the course materials:
git clone https://code.vt.edu/jasonwil/cmda3634_materials.gitTo see what happened type:
ls You should see the cmda3634_materials directory. Now let’s change into that directory using:
cd cmda3634_materials
ls
It is not necessary to type all of cmda3634_materials. Type just the first few letters and press the tab key.
You should see some more directories. To look at the mnist dataset files do:
ls mnistThe MNIST dataset files are stored in compressed format (ending in .gz).
We need to uncompress the data files before we can run the classifiers. To do this type:
gzip -d mnist/*gzNow check again using:
ls mnistYou should see the same files but without the .gz extension. These uncompressed binary files are what the Python, C, and CUDA codes will read.
Step 2 : Preview the MNIST Dataset
Now that the MNIST files are uncompressed, let’s look inside the dataset using two helper Python scripts that turn MNIST images into .png files that we can look at.
These files are in the L01 directory which we can change to using:
cd L01To generate a random 8x8 grid of MNIST images to preview:
python3 random.py 8 The first argument gives the size of the grid. There is an optional second argument that allows you to choose the random seed.
To see what happened type:
ls You should now see a random.png image file.
To browse the image file, use the Colab file browser:
- On the left side of the Colab window, click the folder icon (📁).
- Navigate into
cmda3634_materials/L01.
- Double Click on
random.pngto open it.
You should see a grid of random handwritten digit images pulled from the MNIST training set.
When you are finished looking at the image, close the image window to keep your Colab workspace tidy.
We can also compare a test image to its nearest training image.
MNIST mages are compared by computing the squared distance between their pixel vectors:
\[ \| \mathbf{u} - \mathbf{v} \|^2 = \sum_{i=1}^{784} (u_i - v_i)^2 \]
Here: - Each image is stored as a vector of length 784 (since 28 × 28 = 784 pixels).
- \(u_i\) and \(v_i\) are the pixel intensity values (0–255) of the two images.
- The nearest neighbor is the training image with the smallest squared distance to the test image.
To find the nearest training image to test image 1 run:
python3 match.py 1This command generates an image file match.png that you can preview as before. What do you observe?
Exercise: Find the nearest training image to test image 1114. What do you observe?
Tip: use the up arrow to recall and edit the previous Linux command.
Step 3 : Nearest‑Neighbor Classification (Python, C, CUDA)
Simple Classification Idea. For a test image (u), find the training image (v) with the smallest squared distance: \[\|u-v\|^2\]
Predict the test image’s label as the label of that nearest training image.
Classification rate. If we classify (N) test images and get (C) correct,
\[ \text{classification rate}=\frac{C}{N}. \]
Let’s start by running a small classification task (only the first 100 test images):
python3 nearest.py 100Exercise: What is the classification rate? How long does the Python script take to run? Estimate how long the Python script would take to classify all 10000 test images.
Exercise: The Python code runs quite slow! You can inspect the nearest.py code by double clicking on it in the file browser. What part of the code do you think is taking the most time?
Loops implemented in native Python are particularly slow due to the fact that Python is interpreted (instead of compiled) and does substantial (and slow) runtime error checking.
Next let’s try the nearest neighbor classifier written in the programming language C.
Like Java code, C source code has to be first compiled before it can be run. To compile the nearest.c source code into the executable program nearest type:
gcc -O3 -march=native -o nearest nearest.cCompiler Flags: -O3 and -march=native enable compiler optimizations and -o sets the output program name.
Verify that the program was created:
ls To run the C program to do nearest neighbor classification on 100 test images type:
./nearest 100The ./ in front of nearest tells the shell to look in the current directory for the program. We will more about directories later.
You should see that the C program runs much faster than the Python script and produces the same classification rate. Now try 1000 images:
./nearest 1000Exercise: What is the classification rate? How long does the C Program take to run? Estimate how long the C program would take to classify all 10000 test images.
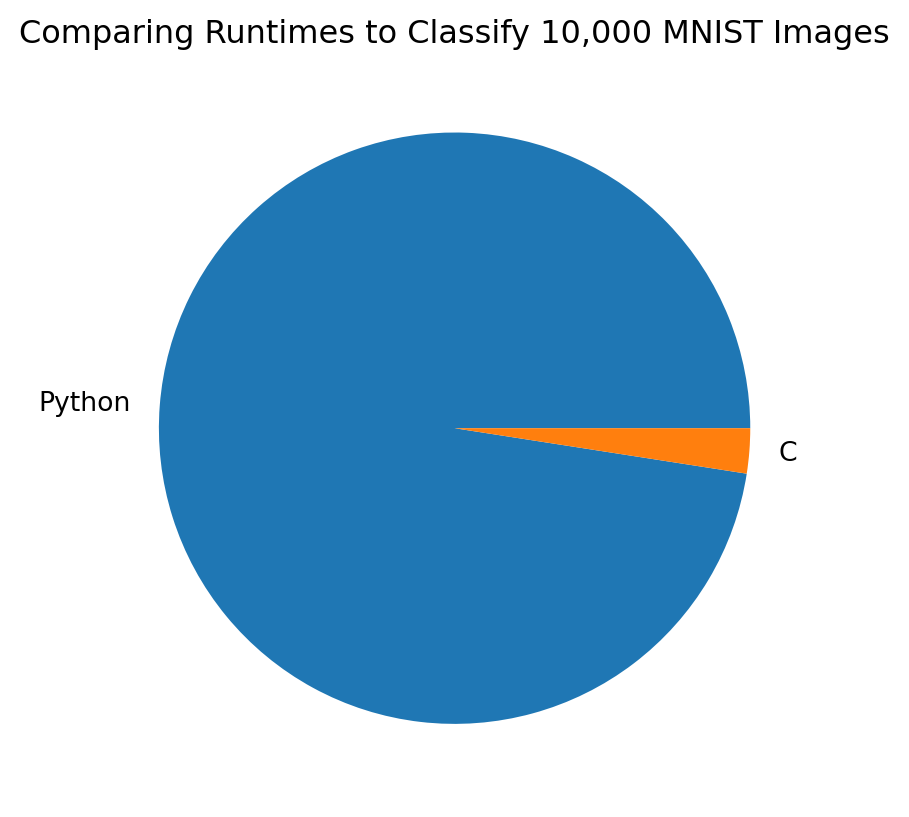
Let’s compare Python and C runtimes for testing all 10000 images. It’s often easier to see performance differences with a figure.
Exercise: Ask an LLM (chatGPT, CoPilot, etc.) the following question: Why is C so much faster than Python?
We can use a GPU (graphics processing unit) to get even better performance. Code to run an an Nvidia GPU is written CUDA.
Running CUDA in Colab requires changing the runtime to use a T4 GPU. Switching runtimes will cause all of the files from your previous session to disappear. Don’t worry we will re-clone the repo, etc.
To switch to a T4 GPU runtime in Google Colab:
- Colab menu: Runtime → Change runtime type
- Set Hardware accelerator to GPU, click Ok and Save
Verify that a T4 GPU is available by typing:
nvidia-smiSince our files have all been deleted we will have to repeat some earlier steps:
git clone https://code.vt.edu/jasonwil/cmda3634_materials.git
cd cmda3634_materials
gzip -d mnist/*gz
cd L01
Like C code, CUDA code must be compiled to create an executable program. To compile CUDA code we use a special Nvidia compiler:
nvcc -O3 -arch=sm_75 -o gpu_nearest gpu_nearest.cu -lcublasThe compile flag -arch=sm_75 tells the compiler to generate code specifically for the Nvidia T4 GPU that we will be running. The -lcublas flag allows us to use special software that dramatically accelerates large-scale matrix multiplication which is crucial for fast nearest neighbor search.
Check to make sure the program gpu_nearest was created:
ls We run GPU programs just like regular C programs. There are no command line arguments for gpu_nearest. The program will test all 10000 images.
./gpu_nearestBe sure to change your runtime back to CPU
GPUs are fast but a limited resource in free Colab.
- Colab menu: Runtime → Change runtime type
- Set Hardware accelerator to CPU, click Ok and Save
Verify there is no GPU:
nvidia-smiYou should see command not found.
Exercise: Ask an LLM why GPUs are so fast for machine learning.
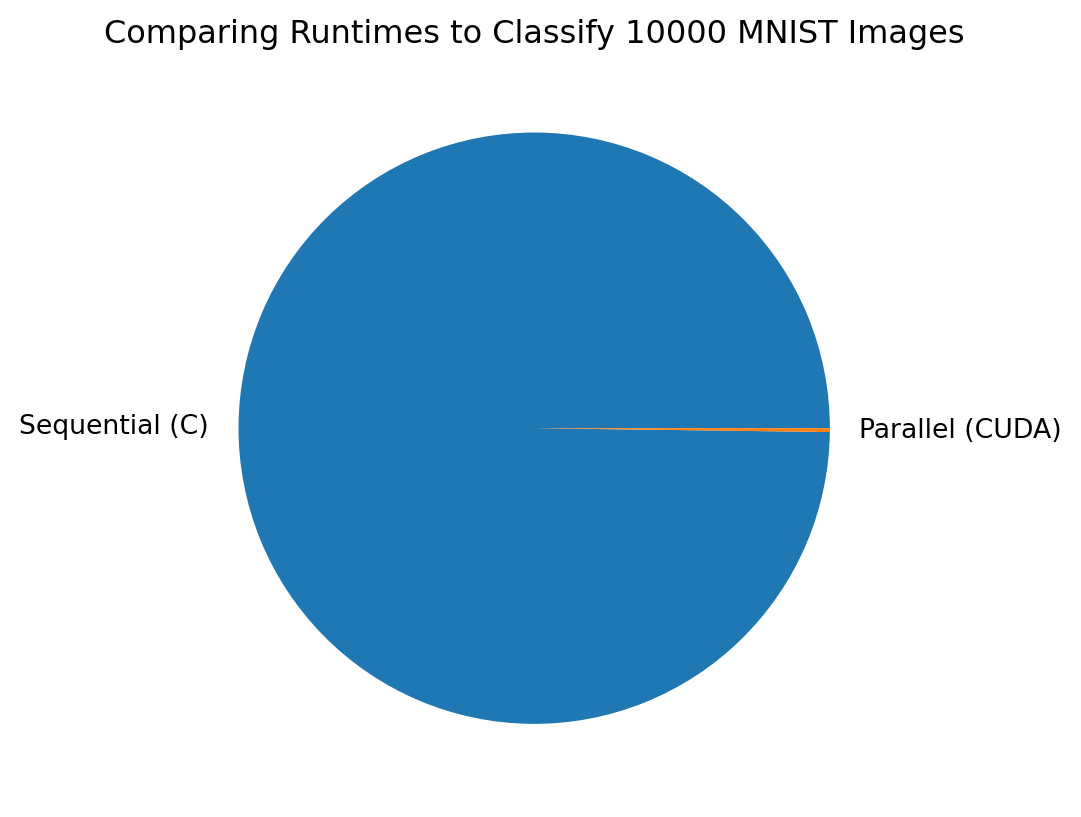
Our C code runs sequentially (one step at a time) but the GPU code runs in parallel (many steps at a time). Here is a graphic illustrating the difference in runtime to test 10000 images.
We can classify even faster using the more modern Nvidia V100 and Nvidia A100 GPUs on ARC (ARC stands for Advanced Research Cluster here at Virginia Tech).
In fact, when using an A100 we can classify 10000 test images using one million training images in around a quarter of a second.
[jasonwil@tinkercliffs2]$ interact -A cmda3634_rjh -p dgx_normal_q -t 10 --gres=gpu:1
[jasonwil@tc-dgx007]$ module load CUDA/11.8.0
[jasonwil@tc-dgx007]$ nvcc -O3 -arch=sm_80 -o gpu_nearest gpu_nearest.cu -lcublas
[jasonwil@tc-dgx007]$ ./gpu_nearest
number of MNIST training images = 1000000
number of MNIST test images = 10000
elapsed time = 0.27 seconds
number of classification errors = 235
classificiation rate = 0.9765
jasonwil@tc-dgx007]$
Note that the A100 was released in 2020. The Nvidia H100 is a GPU which was released in 2023 and offers nearly double the computation speed of the A100! The LLM Grok-1 has 314 billion parameters and was trained using over 100,000 H100 GPUs!
Linux Command Line Basics
In addition to working on Google Colab, we will use the Linux Command Line Interface (CLI) to access the computing power and file systems of the matrix server as well as the ARC (advanced research cluster) computers here at Virginia Tech. This is an important skill because most Linux CLIs work the same way, regardless of the system. Getting comfortable on the Linux CLI will help you work efficiently this semester on matrix and the ARC clusters. It will also prepare you to access instances on cloud computing services such as Amazon AWS, Microsoft Azure, and Paperspace.
I encourage you to use the Internet to help understand parts where you get stuck. In particular, the first link below is to a video on YouTube by Joe Collins at EzeeLinux that gives a very thorough introduction to the Bash Linux Shell.
- Beginner’s Guide to the Bash Terminal
- Getting started with the Linux command line
- Ubuntu’s CLI tutorial
Clear Screen: clear
Let’s start with the command to clear the screen.
clearThis command does not erase previous commands from existence, it just clears the terminal screen. A keyboard shortcut for clear is Ctrl + L.
Present Working Directory: pwd
The Linux OS file system consists of a hierarchical arrangement of directories (also called folders in other OS). The root directory is the lowest directory and is denoted by the forward slash character /
All directories in the Linux file system have a path relative to /
For example, we can find out which directory the shell has placed you in by default by typing
pwdOn Google Colab, we start in the /content directory.
List Contents of Directory: ls
Each directory in the file system may contain sub-directories and also possibly files. A file is a container for a collection of data. A simple example would be a file containing some text.
We use the ls command to find the contents of a directory. For instance we can examine the contents of the current directory with
lsWe see the sub-directory sample_data. There may also be hidden files. We can use the command-line-argument -a to show all contents of the current directory
ls -aTo see what is in the sample_data sub-directory type:
ls sample_dataThe -l command-line-argument tells the ls command that you want information to be listed about the attributes of the contents of the directory. We can use both command-line-arguments by typing ls -al.
To learn more about the root directory type:
ls -l /Each file appears on a separate line and most lines start with the letter d. This indicates that those files are actually sub-directories.
There are several optional command-line-arguments that we can pass to the ls command. You can use a search engine to find man (short for manual) pages for every Linux Terminal command (e.g. type man ls into Google search or an LLM.
You can also use command --help to get information about a particular command.
For example, to learn more about ls type:
ls --helpView Contents of a Text File: cat
We can use the cat command to display the contents of a text file.
For example, the text file os-release located in the /etc directory contains information about our Linux OS version. We can view the file using the command
cat /etc/os-releaseTab Completion
Type the partial command below, but press the Tab key before hitting Enter:
cat /etc/osWhat do you notice? This illustrates a powerful feature of the Linux shell called tab completion.
Now try:
cat /etc/oPress Tab once. What do you notice? Now press Tab again. What happens?
Command History
To view your command history, type:
historyUse the up arrow key to scroll through previous commands. Press Enter to rerun one, or edit it before running.
To clear your command history:
history -cView Contents of a Large Text File Using less
The cat command is great for small files, but for larger ones we use less (or more). Here’s an example:
less /proc/meminfoUse the arrow keys to scroll, or press f or space to move forward and b to move back. Press q to quit.
You can also use less to scroll through long command outputs:
ls -l /usr/bin | lessThe | character is called a pipe — it sends the output of one command (ls) into another (less).
Inside less, press h for help (press q to quit help). Use help to learn how to: - Jump to the top or bottom of the file - Search for content - Find where less and more are located in /usr/bin
The help pages for commands can be too long to fit on a page. Using less can be helpful here:
ls --help | lessBasic File Editing Using Vim
To open a new file with Vim:
vim foo.txtThen: - Press i to enter insert mode and type a sentence or two. - Press Esc, then type :wq to save and quit.
To confirm the file exists:
ls
cat foo.txt
Now let’s add another line at the end of foo.txt:
vim foo.txtInstead of pressing i, just type GA (shift + g, then shift + a) to jump to the end and enter insert mode. Type your new text, press Esc, and type :wq to save and exit.
Verify:
cat foo.txtExplore more Vim features using online tutorials or cheat sheets.
Copying Files: cp
To copy foo.txt to a new file:
cp foo.txt foo2.txtConfirm with:
ls -l
diff foo.txt foo2.txt
The diff command compares two files line by line and shows you any differences.
- If there is no output, the files are identical. - If there is output, it tells you which lines differ and how.
View both files together:
cat foo.txt foo2.txtRedirect that combined output to a new file:
cat foo.txt foo2.txt > bigfoo.txt
cat bigfoo.txt
Now try piping to another command:
cat bigfoo.txt | wc -lWhat do you think wc -l does? Use wc --help to verify your guess.
Creating Small Files Using echo
We can use echo to make small files:
echo 3.4 5.6 -1.2 > foo3.txt
cat foo3.txt
Moving Files: mv
Rename foo.txt to foo4.txt:
mv foo.txt foo4.txt
ls
cat foo4.txt
Making a New Sub-directory: mkdir
To organize your files, create a directory:
mkdir stuff
ls
ls -l
Exercise: What are two ways to tell if a file is a directory?
Now move foo4.txt into the new directory:
mv foo4.txt stuff
ls
ls stuff
cat stuff/foo4.txt
Move all .txt files at once using a wildcard:
mv *.txt stuff
ls
ls stuff
Changing the Present Working Directory: cd
Change into the stuff directory:
cd stuff
pwd
ls
Making a Backup Directory
Now inside stuff, create a backup directory:
mkdir backup
ls
Copy all non-directory files into backup:
cp * backup
ls backup
Edit a file to simulate a mistake:
vim foo2.txtIn Vim, press dd to delete a line, then :wq to save and exit.
Compare original and backup:
cat foo2.txt
cat backup/foo2.txt
diff foo2.txt backup/foo2.txt
Restore the original:
cp backup/foo2.txt .
diff foo2.txt backup/foo2.txt
The single dot . represents the current working directory. So cp backup/foo2.txt . means: Copy foo2.txt from the backup directory into my current directory, keeping the same filename.
More Wildcards
Make a copy and a new directory:
cp bigfoo.txt bigfoo2.txt
mkdir big
Move into big and copy files startig with big from parent:
cd big
cp ../big*.txt .
ls
.. refers to the parent directory. . refers to the current directory. The wildcard big*.txt grabs both bigfoo.txt and bigfoo2.txt.
List files in the parent directory:
ls ../Now let’s copy any file that ends in 2.txt from the parent directory to the current directory:
cp ../*2.txt .
ls
Removing Files: rm
Remove the files just copied to your home directory:
Return to stuff (the parent dirctory) and make test directories:
cd ../
mkdir test1
mkdir test2
mkdir test3
Copy .txt files into them:
cp *.txt test1
cp *.txt test2
cp *.txt test3
Note: These repetive commands are a great way to test your ability to redo a similar command in Linux.
Try each of the following commands. After each rm guess which files will remain and verify your answers.
ls test1
rm test1/*foo2.txt
ls test1

ls test2
rm test2/big*
ls test2

ls test3
rm test3/*foo*
ls test3
Removing an Empty Sub-directory: rmdir
Try this:
rm test3It should fail. Now use:
rmdir test3
ls
If a directory is not empty, rmdir will also fail:
rmdir test2Before using rmdir on a directory that is not empty, remove its contents first:
rm test2/*
rmdir test2
ls
For recursive removal:
rm -r test1
ls
Be careful:
rm -ris dangerous — there’s no undo!
Back up your work regularly withbackupdirectories andGit.
To delete a directory interactively:
rm -ir big
ls
To delete everything else we created in this lecture without using rm -r:
rm *.txt
rm backup/*
rmdir backup
cd ..
rmdir stuff
Linux Command Line Summary
Working with Files
| Command | Description |
|---|---|
cat filename |
Print contents of a file |
less filename |
View long file page-by-page (q to quit) |
echo "text" > file.txt |
Write text to a new file |
cp file1 file2 |
Copy file1 to file2 |
mv file1 file2 |
Rename or move file |
rm file |
Delete file |
rm *.txt |
Delete all .txt files in directory |
diff file1 file2 |
Show line-by-line differences |
Working with Directories
| Command | Description |
|---|---|
mkdir name |
Create a new sub-directory name/ |
rmdir name |
Remove an empty directory |
rm -r name/ |
Recursively delete a directory and contents |
cp * backup/ |
Copy all files to backup/ subdirectory |
cp ../*.txt . |
Copy all .txt files from parent directory |
Reminder:
rm -ris permanent. Use with caution!
Useful Shortcuts and Tools
| Shortcut / Command | Description |
|---|---|
Tab |
Auto-complete filenames/paths |
Up Arrow |
Recall previous command |
history |
Show previous commands |
history -c |
Clear command history |
clear or Ctrl+L |
Clear the terminal screen |
ls -l /usr/bin | less |
View many commands with scrolling |
command --help |
Show usage info for most commands |